
Course Tour
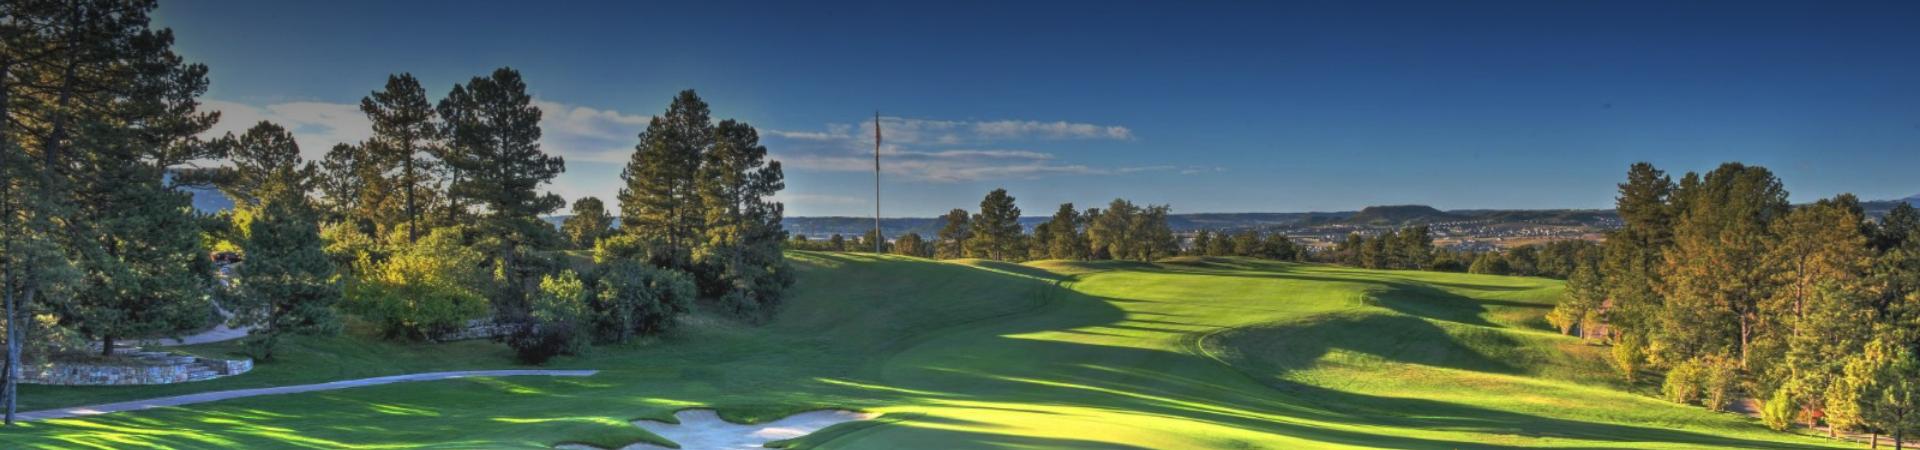
HOLE #1 PAR: 5
644 
644 ![]()
600 
578 ![]()
![]()
506 ![]()
![]()
![]()
454 ![]()
![]()
![]()
![]()
Local Knowledge:
In 1980, Jack Vickers asked Jack Nicklaus to design a world class golf course in Colorado--and Castle Pines was born. We have one of the most spectacular starting holes in golf with its stunning views of the Rocky Mountain Front Range.
Long hitters can go for this Par 5 in two if they hit a good tee shot down the right side of the fairway. The downhill lie on your second can be a challenge, so most players should lay up to a comfortable yardage and avoid the three bunkers around the green. Look out for the subtle ridge in this green that will impact your putts more than you think.
HOLE #2 PAR: 4
408
408 ![]()
408
379 ![]()
![]()
352 ![]()
![]()
![]()
328 ![]()
![]()
![]()
![]()
Local Knowledge:
The second hole isn't a long par 4, but a new pond and bunker guard the front and wrap around the right side of the green. The safe play is to lay back down the right side of the fairway off the tee to take advantage of the natural slope from right to left. A more aggressive route is with driver down the left side, which could leave a shorter approach but also risks getting wet if kept too far right.
The second shot plays slightly downhill; though it won't be a long one, it demands an accurate approach. The green is long and narrow and is deceptively difficult to read.
HOLE #3 PAR: 4
462
462 ![]()
436
387 ![]()
![]()
352 ![]()
![]()
![]()
307 ![]()
![]()
![]()
![]()
Local Knowledge:
The third hole is still heading down the valley as the terrain starts to open up. This par 4 has a double fairway option off the tee, with a dry gulch separating the two. The easier tee shot is down the left side, but you will be faced with a tougher second to the shallow and diagonal green. The right fairway option is tougher to hit off the tee, but you will have a much better approach angle to the hole.
By the green, bunkers are strategically placed short and long to emphasize the importance of distance control. There isn't much slope once you're on the green, so putting should be pretty straight forward.
HOLE #4 PAR: 3
230
230 ![]()
205
187 ![]()
![]()
166 ![]()
![]()
![]()
147 ![]()
![]()
![]()
![]()
Local Knowledge:
The fourth is a downhill par 3 with a wash along the entire right side of the hole. Although the green is generously sized, it can look deceptively small from the tee. The wash and two deep bunkers on the right often cause players to overcompensate to the left.
Once you are safely on, you'll have to navigate a large, two-tiered putting surface that slopes more from front to back than it initially appears.
HOLE #5 PAR: 4
467
411 ![]()
411
393 ![]()
![]()
330 ![]()
![]()
![]()
298 ![]()
![]()
![]()
![]()
Local Knowledge:
When you get to the fifth hole, the golf course turns uphill. This par 4 has trees on the right and a fairway bunker on the left off the tee. If you can carry the crown in the fairway, your tee shot will roll out and significantly shorten the hole.
If you can't carry the crown, you will face an uphill second shot with a long club. Two bunkers guard the front right, so it is better to be long and left on your second. The green itself is angled away from the fairway to the right, and there is a large ridge that makes cross-green putts difficult to judge.
HOLE #6 PAR: 4
417
408 ![]()
380
380 ![]()
![]()
358 ![]()
![]()
![]()
341 ![]()
![]()
![]()
![]()
Local Knowledge:
The sixth hole is a par 4 that starts off from an elevated tee to a generous fairway guarded by a large, deep bunker on the right. Keep your tee shot to the left for a safer play, or carry the bunker for a shorter approach.
The real challenge begins on the second shot where club selection is critical. A ball coming up short will likely roll back down the hill, and a ball that goes long leaves a very difficult chip. Crowns and ridges run through this green, and it's especially quick if you are putting from the back to the front.
HOLE #7 PAR: 3
185
185 ![]()
165
145 ![]()
![]()
121 ![]()
![]()
![]()
100 ![]()
![]()
![]()
![]()
Local Knowledge:
The par 3 seventh was designed with the seventeenth hole at Glen Abbey Golf Club in mind. The elevated tee lies tucked into the trees, and four bunkers protect the green. The drop in elevation and swirling winds make club selection tough, and the large green is separated from right to left by a slope that will affect the break on most putts.
A small bunker is built right into the green and can make this usually tame hole a beast.
HOLE #8 PAR: 5
570
540 ![]()
407
407 ![]()
![]()
479 ![]()
![]()
![]()
451 ![]()
![]()
![]()
![]()
Local Knowledge:
A three shot par 5 for most, the eighth hole plays uphill the entire way to an elevated green.
Drive the ball right down the middle to avoid the trees on the right and the two fairway bunkers on the left; then do the same on your second shot. Long hitters can get home in two, but they must avoid the trees on the right and a fairway bunker 25 yards short of the green.
Most players should leave themselves a comfortable yardage for their third. Two greenside bunkers sit to the left, but there is plenty of room on the right for a missed shot. The eighth green is one of the smallest, and a subtle ridge will come in to play when you are putting.
HOLE #9 PAR: 4
458
431 ![]()
431
394 ![]()
![]()
370 ![]()
![]()
![]()
350 ![]()
![]()
![]()
![]()
Local Knowledge:
Originally the ninth hole had a ravine coming down from the clubhouse area. Jack Vickers thought it would be a good idea to put in a water feature, so the ravine was dammed up to create a series of cascading ponds on the right that partner with three fairway bunkers on the left. Now it's one of the toughest drives on the course.
Once you are in the fairway, your second shot to this par 4 is uphill to a shallow green with a spine separating the left side from the right. Be sure to take enough club as most players come up short--and remember that this green can be one of the quickest on the course.
HOLE #10 PAR: 4
521
496 ![]()
496
467 ![]()
![]()
432 ![]()
![]()
![]()
397 ![]()
![]()
![]()
![]()
Local Knowledge:
The tenth hole has a beautiful view of Castle Rock in the distance and is always one of the toughest to par. Aim for the left center of the fairway off the tee, and remember that bogey can be a good score.
This par 4 is downhill to a green guarded by water in the front, making the lie and club selection on the second shot difficult. The green is settled in behind the pond, and it's better to be long and left than short. There is a ridge on the back of the green that will influence most putts, and it's quick when you are putting down toward the water.
HOLE #11 PAR: 3
197
197 ![]()
197
175 ![]()
![]()
149 ![]()
![]()
![]()
140 ![]()
![]()
![]()
![]()
Local Knowledge:
The eleventh hole is a picturesque par 3 that Jack Vickers also thought would play well with water. A stream and two ponds guard this two-tiered green, which really makes the front hole location the toughest.
The green is 66 feet below the tee box, so this hole will play shorter than the yardage. Two bunkers on the right and one on the back left protect the green, and landing on the right tier is the key to a makeable putt.
HOLE #12 PAR: 4
440
440 ![]()
370
370 ![]()
![]()
352 ![]()
![]()
![]()
325 ![]()
![]()
![]()
![]()
Local Knowledge:
Jack Nicklaus said he always enjoyed the tee shot on the twelfth hole because you can challenge the fairway bunkers on the right and be rewarded when you hit a good shot. But be forewarned that you will have some work left if your ball doesn't find the fairway. There is also a water hazard down the entire left side of this par 4, so a good tee shot is imperative.
You can also play short of the bunkers off the tee because there is plenty of room to lay up, but a longer second shot brings the water left of the green and the two greenside bunkers into play. The green is somewhat narrow, but overall it isn't too difficult to read.
HOLE #13 PAR: 4
439
439 ![]()
394
394 ![]()
![]()
346 ![]()
![]()
![]()
313 ![]()
![]()
![]()
![]()
Local Knowledge:
The thirteenth hole is a terrific par 4 where you drive out of the shoot off the tee to an uphill fairway that crowns and then drops down into the green. Longer hitters can go down the right side of the fairway, and any drive that clears the crown will get a big kick down the other side.
Four bunkers strategically placed around the green all come into play and the two toughest hole locations are on the very front and on the elevated shelf in the back right. This is a hard green to judge when it comes to speed as it slopes from front to back and then up to the right.
HOLE #14 PAR: 5
623
595 ![]()
550
550 ![]()
![]()
508 ![]()
![]()
![]()
449 ![]()
![]()
![]()
![]()
Local Knowledge:
The fourteenth hole is a tree lined, picturesque downhill par 5. Off the tee, the fairway is generous, but a grassed-in wash with deep rough guards the left side. The right center of the fairway is the ideal spot.
Your second shot requires either a layup before the creek that crosses the fairway or the guts to go over it. For the rest of the hole, water is in play as the creek flows along the left to a pond by the green. The green has a ridge in the middle that divides it from right to left, and cross green putts can really break. The best play is always to keep your ball below the hole and avoid the bunker that guards the back part of this shallow green.
HOLE #15 PAR: 4
403
403 ![]()
403
355 ![]()
![]()
329 ![]()
![]()
![]()
300 ![]()
![]()
![]()
![]()
Local Knowledge:
The fifteenth hole is a dogleg right par 4 where accuracy, not distance, is the objective off the tee. Hit your drive down the left center of the fairway to avoid the pines and cottonwoods on the right. These trees will block a shot to the green if you don't drive it left enough or far enough.
The green is one of the largest on the course, with three bunkers surrounding it on the left and a pond guarding the right. In addition to a ridge that divides the green from front to back, the general slope is toward the water, and the speed can be treacherous.
HOLE #16 PAR: 3
224
204 ![]()
181
166 ![]()
![]()
138 ![]()
![]()
![]()
98 ![]()
![]()
![]()
![]()
Local Knowledge:
A picturesque par 3, the sixteenth hole has a green tucked in behind three cascading ponds. In addition to the water, three bunkers help define the putting surface but can make par a tough score if your ball lands in one.
It you have to bail out, err to the right and make sure you take enough club to clear the water in case you pull it left. The green size is deceptive from the tee, but it's not too difficult to putt once you are on the putting surface.
HOLE #17 PAR: 5
533
492 ![]()
492
436 ![]()
![]()
402 ![]()
![]()
![]()
373 ![]()
![]()
![]()
![]()
Local Knowledge:
The seventeenth hole should give most players a good chance at birdie. This uphill par 5 is reachable in two with a good drive. Hit it right up the middle and avoid Cally's Creek on the left and the trees on the right. If you can go for it in two, aim for the right side of the green to dodge the two deep bunkers on the left.
The L-shaped green is more accessible when you are chipping or pitching from the right side. If you can't hit the green in two, it's best to layup so you are hitting your third from a flat lie. The green itself has a lot of slope from back to front, and missing it long might be the hardest up and down on the course.
HOLE #18 PAR: 4
480
437 ![]()
437
422 ![]()
![]()
356 ![]()
![]()
![]()
317 ![]()
![]()
![]()
![]()
Local Knowledge:
The eighteenth is a classic par 4 closing hole framed by the clubhouse in the background. It's uphill from tee to green, so aim between the bunkers off the tee and let the fairway funnel your ball to the flattest lie. Long hitters can carry the right bunker but will be heavily penalized if they come up short.
The green is guarded by three bunkers and features a prominent swale in the middle, making putting tricky when the green speeds are up. Shorter approach shots can go right at the flag, but a safer line from further away is to favor the right side. It's a great finishing hole for a great course.